Vivian Helena Aumond-Capone and Heather Lair have new art on their gallery pages. Check ’em out!
More new art in galleries
1

Vivian Helena Aumond-Capone and Heather Lair have new art on their gallery pages. Check ’em out!
Lynn Chinnis, Maureen Curlewis, Franki Kohler and Rita Summers have new art on their gallery page. Check ’em out!
I shared the A, B, and C postcards from our Alphabet trade here. And now for D, E and F:
D is for Dandelion by Laurie Dhandapani
 Earthquake by Evie Harris
 Eek by Maureen Callahan
 Focus by Sara Kelly
 Fiddlehead Fern by Sarah Ann Smith
 Doesn’t this set your creativity straight into raging mode? More of the alphabet trade results soon.
This month we are in snowy Hope, Maine to visit with Sarah Ann Smith who has a remodeling story to share.
Do you call it a studio or sewing room? To yourself, to friends and family? Why do you think this is so? Difference in starting point between quilting and art? Thinking of this as a business rather than a hobby?
Mostly I call it “my room,” but I also call it my studio, because it is. And my quilting is definitely my business: I teach, write, and sell art quilts .
We moved to this house two years ago, and the basement was icky beyond belief. The walls in the center area were a dark roasted pumpkin color where they were painted, there was no trim on the doors, a raw opening to a long skinny room with two bare bulbs painted chocolate brown and another long skinny room painted white. Both rooms had peeling paint on the cement floor.

Brown room before move-in

White room before move-in

Brown room at move-in

White room at move-in
I fixed up the basement using the idea from kitchen design of “work zones.” I figured out where I would have cutting, ironing, sewing, paperwork, relaxing, storage.
The painter spray-painted the under side of the joists white because the ceilings were too low to add a dropped ceiling. That helped immensely right there!
Our carpenter/builder tore down the wall dividing the dark brown and white rooms to make one large space about 22 x 22 feet. I selected a pale apricot for the walls, and had our builder trim out the four tiny windows up near the ceiling. I scraped (and scraped and scraped) all the ugly peeling paint on the floor and re-painted with proper floor paint in a lovely grass green.

Wall down between rooms
We added nine 2-bulb fluorescent fixtures with daylight bulbs. Gloom was banished! The color of the lighting fixtures is exactly the same as the color of light that comes in one of the windows in late afternoon (as long as it isn’t blocked by snow). The one electrical outlet that was in the wall that was torn down became a ceiling outlet. Now my iron’s cord doesn’t trail on the floor. This may be one of my favorite things in the room!

Walls and ceiling painted, new lights
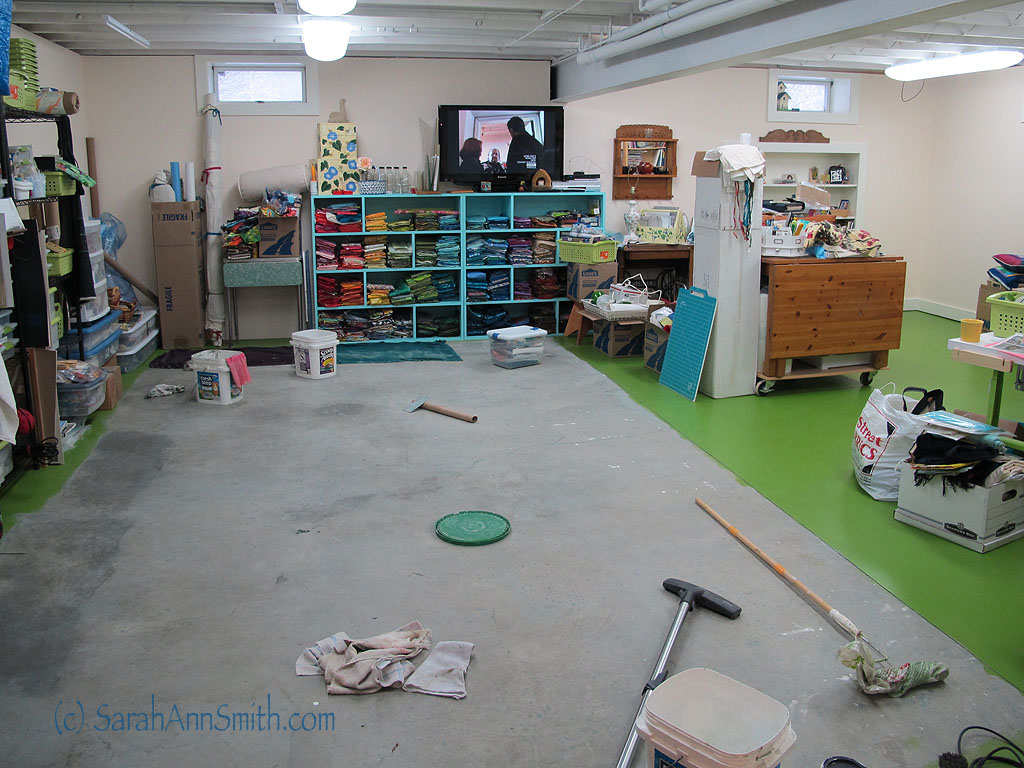
Painting the floor
What do you have in the room? machines, supplies, fabrics, paints, etc. Anything that might surprise the rest of us?
All of the above! I have my main sewing machine, fabrics, lots of thread, five bookshelves packed with books, a sitting/reading/handwork area, a worktable for cutting and construction, a large ironing board, and a worktable for art.
My antique Hoosier cabinet is my favorite old piece: the knife drawer holds scissors, I have notions in the cubby under the counter, patterns in the bread bin, and my external hard drive and business “stuff” behind the tambour doors. I also love the antique spool chest that holds my thread. For years it was a living room end table. When I had too much thread for the plastic thread boxes I wondered what to use and had a light bulb moment : the SPOOL chest could store SPOOLS of thread!
How is your “stuff” organized? How do you organize your fabric? By color? Amount? Any separate categories (batiks, hand dyes)? How do you organize your thread (color, weight)?
I was able to built my dream storage. Since the room was larger than I needed but had no storage, I told our carpenter that I wanted a deep 28 inch “closet” that runs the entire length of one wall. I specified that I wanted six doors, 4 feet wide with 1-inch rigid foam insulation, to use as design walls. He figured out that two hollow-core doors, glued side-by-side and trimmed out with wood with the rigid foam on top would be stable (plywood could warp). After he built the doors, I “upholstered” them with a layer of batting and then cream flannel. I used one king size sheet split down the center to cover two doors. Finally, I covered half-inch foam core to make the “valance” that covers the wood from which the doors hang and conceals the hanging tracks. I also purchased a large piece of non-stick press sheet (36 x 72 inches, from Valerie Hearder in Canada) to pin to one of the doors, so I can do my fuse-collage process directly on the design wall as well as on my ironing surface.

Upholstering closet doors into design walls
In the left side of the closet I have business stuff: a wire-grid shelf from the big-box-hardware store that has teaching stuff: my books for sale, patterns, teaching supplies (I often take stuff for students to use),materials for class kits, my binders (one for each class) with the course materials and handouts, etc. Batting (light!) is stored on the top of this shelf. My ugly but necessary file cabinet with all the business paperwork, patterns, etc. with a drawer unit with yarns and embellishments on top is next.

Business and teaching supplies
The center of the closet is the art zone. Like items are together: beads,collage materials, paints and inks, gesso/gel medium, extra paper supplies, etc. They are stored in matching plastic bins from Target, so they all stack neatly. There is only ONE place to have to hunt for something! My serger and Singer Featherweight (heavy) are on a bottom shelf. Rolls of paper and sketchbooks (bought on sale) are in the “paper” section. My “to-do list includes making labels for the boxes.

Art supplies
Finally, there is the quilt-storage zone. I made a system that is 6 feet long using the method home decorator fabric stores use: vertical boards with “U” shaped slots and dowels. I covered heavy cardboard tubes with batting and fabric so the acids in the tubes won’t affect the quilts, then roll my quilts on the tubes and cover them with muslin covers. My next chore is to use archival tyvek to make outer covers. That storage space is right under our master bedroom shower, and I live in fear of a leak! On the floor, but not seen are a couple of under-the bed-storage boxes holding smaller quilts that I often take for teaching. As you can see, quilts sometimes get draped over the rods rather than wrapped.
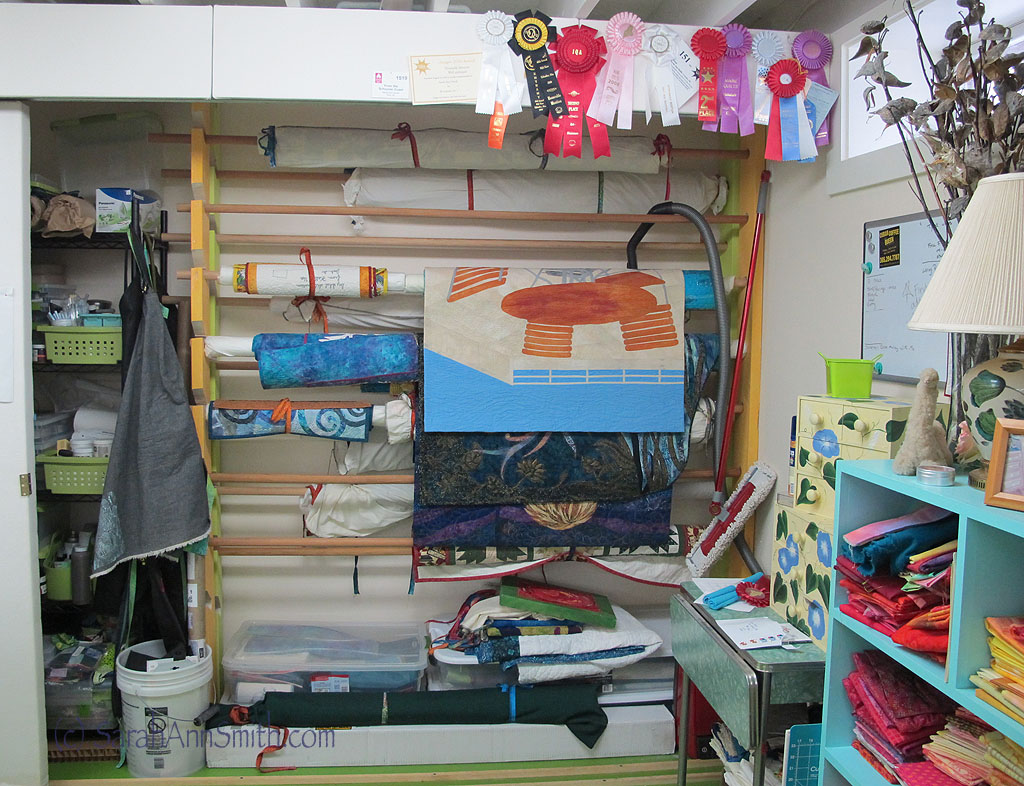
Quilt Storage
Fabric is stored on some shelves our carpenter made, based on Carol Taylor’s studio storage which is pictured on her website. She gave me the dimensions of her units. I designed mine smaller, but using every last quarter inch of the plywood sheets. Fabric is sorted in columns by color Red, Yellow/Orange, Greens, Blues, Purple, Earthy, and White/gray/black, with hand-dyes on the top shelf, the light value down to darkest value on the bottom., and they fit on the shelves without hanging over the front edge.
Do you have anything, supplies, more machines, etc. tucked away in any other rooms of the house. How many other rooms? (My husband likes to talk about that one.) Has a family member or significant other ever accused you of “taking over” the entire house? If you have a separate building, we want lots of pictures.
I store my fabric dyes and supplies outside my studio in order to protect against dye powders making messes. Dyeing happens elsewhere, and I’m currently planning to put in a utility sink in another corner of the basemen for that. Dye is the only real exception, other than my pile of “current” stuff to read and do near my end of the living room sofa. That’s why I got such a nice space in the basement: to keep it contained! BUT, my ideas on organization and storage would work no matter what size your studio: just think of “work zones.”
How much horizontal surface do you have, and is it ever enough? Do you have to move piles of stuff to cut anything bigger than a fat quarter?
Yes, there can be enough space—too much means more to tidy. I can’t function with too much clutter and mess. I have to have a tidy attack once a project is done. I can’t stand wasting time looking under piles of fabric flung here and there to find something, so I clean it up. And with the sewing tables (which I designed using industrial “K” bases and had made by our carpenter), my cutting station (an old IKEA dining table on a platform I made with wheels underneath), and my new art table (ordered from Dick Blick), if one surface needs to be cleared, the pile just gets moved!
Do you straighten/organize as you go, putting each fabric away as you cut, or do you clean up after a project? How many projects do you work on at a time and how do you keep them organized?
I have several UFOs, but tend to work on just one project at a time. If I don’t focus on one at a time, I get too distracted, don’t know where to begin, and just don’t get anything done. So I work on something, finish it, then move on. Sure, there are times when I have to interrupt for an urgent get well card or something, but for the most part, one major thing at a time. And any mending for the family must wait until the project is done and the deadline is met! During any given project, it can look like Hurricane Sarah hit, but then I tidy.
Anything more you want to add about your studio, organization, working methods, etc., please do.
I’ve been hoping to get featured in one of the “studios” type of magazines for years, so one time sat down and wrote what I liked about my studio, what I didn’t, and figured out what it would take to “fix” things (this was in the old house). I realized that if I simply didn’t buy ten to fifteen yards of fabric, I could take that money and create storage that would solve the problems which were really all the same problem: lack of storage. That’s when I bought the shelves and clear plastic boxes that are now in my giant closet. Think about how you use your space. What sorts of supplies do you have? What sorts of artwork do you do? Is it efficient? If not, what would make it better. If the art studio fairy granted you three wishes to make your space better, what would you wish? OK…now that you’ve figured that out, figure out how to make it happen. Thrift shops, estate sales and Habitat for Humanity re-stores are great ways to find bargains for fixing up your space without spending a fortune. Go do it, then make art!
Thank you Sarah for sharing your studio with us and especially for the cool storage ideas.
See Sarah’s work on her website or blog
Next month: Karin McElvein
